2010-11-14

About BioPackages


Bio-Linux (Debian like)
You can find independent bio-tools programs .deb at http://nebc.nerc.ac.uk/bio-linux/dists/unstable/bio-linux/binary-i386/
Or you can configurethe repository like http://nebc.nerc.ac.uk/tools/bio-linux-5/other-bl-docs/package-repository
You can:

&] sudo gedit /etc/apt/sources.list
#Bio-Linux package repository
deb http://nebc.nox.ac.uk/bio-linux/ unstable bio-linux

&] sudo apt-get update
If it asks for a key
&] sudo apt-get install bio-linux-keyring
&] sudo apt-get update
or you can install them one by one
&] sudo apt-get install bio-linux-emboss

Blast
Install following http://bioinformatics.ai.sri.com/ptools/installation-guide/released/blast.html
Follow the procedure for MS-Win http://www.ncbi.nlm.nih.gov/staff/tao/URLAPI/pc_setup.html
Follow the following for the rest http://www.ncbi.nlm.nih.gov/staff/tao/URLAPI/unix_setup.html
Where you can find the latest executables and the latest release.
&] sudo rpm -i ncbi-blast-2.2.24+-2.i686.rpm
&] sudo cp -rf netblast-2.2.24-ia32-linux.tar.gz /opt
&] sudo tar -zxvf netblast-2.2.24-ia32-linux.tar.gz
&] sudo ln -s netblast-2.2.24 netblast
&] sudo cp -rf wwwblast-2.2.24-ia32-linux.tar.gz /opt
&] sudo tar -zxvf wwwblast-2.2.24-ia32-linux.tar.gz
&] sudo ln -s wwwblast-2.2.24 wwwblast

BLAT
Now at http://genome-test.cse.ucsc.edu/~kent/exe/linux/
&] sudo mkdir -p /opt/BLAT/ ; sudo cp *.{zip,gz} /opt/BLAT/
&] cd /opt/BLAT/
&] sudo unzip *.zip
&] sudo gunzip *.gz

ClustallX
Now at http://www.clustal.org
Find the last source or the old source.
Install using:
&] sudo cp ~/Downloads/clustalx-2.0.12-linux-i686-libcppstatic.tar.gz /opt ; cd /opt
&] sudo tar -zxvf clustalx-2.0.12-linux-i686-libcppstatic.tar.gz; cd clustalx-2.0.12-linux-i686-libcppstatic
&] sudo ln -s clustalx-2.0.12-linux-i686-libcppstatic clustalx
&] sudo ./installer
&] Choose a directory for the executable [/usr/local/bin]?
&]  + Symlinked '/opt/clustalx-2.0.12-linux-i686-libcppstatic/clustalx2' to '/usr/local/bin/clustalx2'
&] Location of components:  /opt/clustalx-2.0.12-linux-i686-libcppstatic
&] Location of executable:  /usr/local/bin
 
ClustallW
Now at http://www.clustal.org
Find the last source or the old source.
Install using:
&] sudo cp ~/Downloads/phylip-3.69.tar.gz /opt ; cd /opt
&] sudo tar -zxvf phylip-3.69.tar.gz ; cd phylip-3.69/src

&] sudo make; sudo  make install; sudo make all
&] sudo ln -s phylip-3.69 phylip

(N)Coils
Find the last source.
Install using:
&] sudo cp ~/Downloads/ncoils.tar.gz /opt ; cd /opt
&] sudo tar -zxf ncoils.tar.gz ; cd coils ; sudo chmod -R +x *
&] sudo sudo cc -O2 -I. -o ncoils-osf ncoils.c read_matrix.c -lm # not in
&] export COILSDIR=/opt/coils

HMMER
Find the last source.
Install using:
&] sudo cp ~/Downloads/hmmer-3.0.tar.gz /opt ; cd /opt
&] sudo tar -zxf hmmer-3.0.tar.gz ; cd coils ; sudo chmod -R 755 * ; sudo chown -R root *
&] ln -s hmmer3.0 hmmer-3.0 ; cd hmmer
&] sudo ./configure ; sudo make ; sudo make check
&] sudo make install

Phylip
Find the last source or the old source.
Install using:
&] sudo cp ~/Downloads/phylip-3.69.tar.gz /opt ; cd /opt
&] sudo tar -zxvf phylip-3.69.tar.gz ; cd phylip-3.69/src
&] sudo make ; sudo make install ; sudo make all

Simcoal2
Find the last source or the old source.
Install using:
&] sudo cp ~/Downloads/simcoal2_1_2_linux.tar.gz /opt ; cd /opt
&] sudo mkdir simcoal2_1_2; sudo mv simcoal2_1_2_linux.tar.gz simcoal2_1_2
&] sudo tar -zxvf clustalw-2.0.12.tar.gz;sudo rm -rf simcoal2_1_2_linux.tar.gz
&]

T-Coffee
Find the last source.
Install using:
&] sudo cp ~/Downloads/T-COFFEE_distribution_Version_4.85.tar.gz /opt ; cd /opt
&] sudo tar -zxpf T-COFFEE_distribution_Version_4.85.tar.gz ; cd T-COFFEE_distribution_Version_4.85 ; sudo chmod -R +x *
&] cd t_coffee_source
&] sudo make clean
&] sudo make -i CC=gcc USER_BIN=../bin/ all ; cd ..
&] mkdir -p $HOME/.t_coffee/{cache,methods,mcoffee,tmp}
&] sudo ln -s /opt/T-COFFEE_distribution_Version_4.85 /opt/T-COFFEE
&] export TCOFFEE_HOME=/opt/T-COFFEE
&] export TCOFFEEDIR=$TCOFFEEDIR/bin


UGene
Find the last source.
Install using:
&] sudo rpm -i ugene-1.7.2-1.fc12.i686.rpm #in fedora

Wise2
Find the last source.
Install using:


2010-10-19

About Design Patterns

AbstractFactory
Creates an instance of several families of classes.
Provide an interface for creating families of related or dependent objects without specifying their concrete classes.

Builder
Separates object construction from its representation.
Separate the construction of a complex object from its representation so that the same construction process can create different representation.

FactoryMethod
Creates an instance of several derived classes.
Define an interface for creating an object, but let subclasses decide which class to instantiate. Factory Method lets a class defer instantiation to subclasses.

Prototype
A fully initialized instance to be copied or cloned.
Specify the kind of objects to create using a prototypical instance, and create new objects by copying this prototype.

Singleton
A class of which only a single instance can exist.
Ensure a class has only one instance and provide a global point of access to it.


Adapter
Match interfaces of different classes.
Convert the interface of a class into another interface clients expect. Adapter lets classes work together that couldn't otherwise because of incompatible interfaces.

Bridge
Separates an object’s interface from its implementation.
Decouple an abstraction from its implementation so that the two can vary independently.

Composite
A tree structure of simple and composite object.

Compose objects into tree structures to represent part-whole hierarchies. Composite lets clients treat individual objects and compositions of objects uniformly.

Decorator
Add responsibilities to objects dynamically.
Attach additional responsibilities to an object dynamically. Decorators provide a flexible alternative to subclassing for extending functionality.

Facade
A single class that represents an entire subsystem.
Provide a unified interface to a set of interfaces in a subsystem. Façade defines a higher-level interface that makes the subsystem easier to use.

Flyweight
A fine-grained instance used for efficient sharing.
Use sharing to support large numbers of fine-grained objects efficiently.

Proxy
An object representing another object.
Provide a surrogate or placeholder for another object to control access to it.

ChainResp
A way of passing a request between a chain of objects.
Avoid coupling the sender of a request to its receiver by giving more than one object a chance to handle the request. Chain the receiving objects and pass the request along the chain until an object handles it.

Command
Encapsulate a command request as an object.
Encapsulate a request as an object, thereby letting you parameterize clients with different requests, queue or log requests, and support undoable operations.

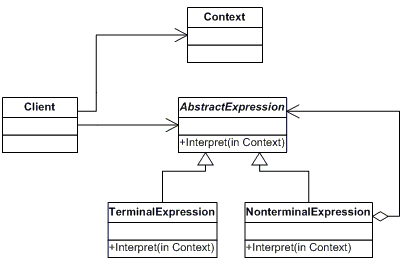
Interpreter
A way to include language elements in a program.
Given a language, define a representation for its grammar along with an interpreter that uses the representation to interpret sentences in the language.

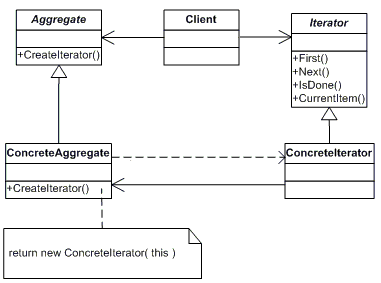
Iterator
Sequentially access the elements of a collection.
Provide a way to access the elements of an aggregate object sequentially without exposing its underlying representation.

Mediator
Defines simplified communication between classes.
Define an object that encapsulates how a set of objects interact. Mediator promotes loose coupling by keeping objects from referring to each other explicitly, and it lets you vary their interaction independently.

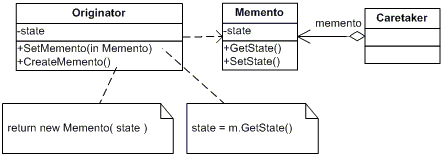
Memento
Capture and restore an object's internal state.
Without violating encapsulation, capture and externalize an object's internal state so that the object can be restored to this state later.

Observer
A way of notifying change to a number of classes.
Define a one-to-many dependency between objects so that when one object changes state, all its dependents are notified and updated automatically.

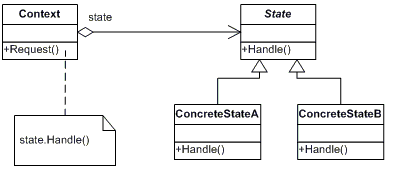
State
Alter an object's behavior when its state changes.
Allow an object to alter its behavior when its internal state changes. The object will appear to change its class.

Strategy
Encapsulates an algorithm inside a class.
Define a family of algorithms, encapsulate each one, and make them interchangeable. Strategy lets the algorithm vary independently from clients that use it.

TemplateMethod
Defer the exact steps of an algorithm to a subclass.
Define the skeleton of an algorithm in an operation, deferring some steps to subclasses. Template Method lets subclasses redefine certain steps of an algorithm without changing the algorithm's structure.

Visitor
Defines a new operation to a class without change.
Represent an operation to be performed on the elements of an object structure. Visitor lets you define a new operation without changing the classes of the elements on which it operates.

About Makefile C Flags

Optimizing Your Makefile C Flags for different OS
There is a different  setup for differents OS:

# Linux defaults:
prefix = /usr
CC=gcc
#CFLAGS=-ggdb -Wall -DLINUX -D_LARGEFILE64_SOURCE -D_FILE_OFFSET_BITS=64
CFLAGS=-O2 -Wall -fomit-frame-pointer -DLINUX -D_LARGEFILE64_SOURCE -D_FILE_OFFSET_BITS=64
LDFLAGS=-s
TREE_DEST=tree

MANDIR=${prefix}/man/man1
VERSION=1.5.2.2
BINDIR=${prefix}/bin
MAN=tree.1

# Uncomment for FreeBSD:
prefix = /usr
CC=gcc
CFLAGS=-O2 -Wall -fomit-frame-pointer
LDFLAGS=-s
TREE_DEST=tree
XOBJS=strverscmp.o
MANDIR=${prefix}/man/man1
VERSION=1.5.2.2
BINDIR=${prefix}/bin
MAN=tree.1

# Uncomment for Solaris:
prefix = /usr
CC=cc
CFLAGS=-xO0 -v
LDFLAGS=
TREE_DEST=tree
XOBJS=strverscmp.o
MANDIR=${prefix}/share/man/man1
VERSION=1.5.2.2
BINDIR=${prefix}/bin
MAN=tree.1

# Uncomment for Cygwin:
prefix = /usr
CC=gcc
CFLAGS=-O2 -Wall -fomit-frame-pointer -DCYGWIN
LDFLAGS=-s
TREE_DEST=tree.exe
XOBJS=strverscmp.o
MANDIR=${prefix}/man/man1
VERSION=1.5.2.2
BINDIR=${prefix}/bin
MAN=tree.1

# Uncomment for OS X:
prefix = /usr
CC=cc
CFLAGS=-O2 -Wall -fomit-frame-pointer -no-cpp-precomp
LDFLAGS=
TREE_DEST=tree
XOBJS=strverscmp.o
MANDIR=${prefix}/man/man1
VERSION=1.5.2.2
BINDIR=${prefix}/bin
MAN=tree.1

# Uncomment for HP/UX:
prefix = /usr
CC=cc
CFLAGS=-Ae +O2 +DAportable -Wall
LDFLAGS=
TREE_DEST=tree
XOBJS=strverscmp.o
MANDIR=${prefix}/man/man1
VERSION=1.5.2.2
BINDIR=${prefix}/bin
MAN=tree.1

# Uncomment for OS/2:
prefix = /usr
CC=gcc
CFLAGS=-02 -Wall -fomit-frame-pointer -Zomf -Zsmall-conv
LDFLAGS=-s -Zomf -Zsmall-conv
TREE_DEST=tree
XOBJS=strverscmp.o
MANDIR=${prefix}/man/man1
VERSION=1.5.2.2
BINDIR=${prefix}/bin
MAN=tree.1

# Uncomment for HP NonStop:
prefix = /opt
CC=c89
CFLAGS=-Wextensions -WIEEE_float -g -Wnowarn=1506 -D_XOPEN_SOURCE_EXTENDED=1 -Wallow_cplusplus_comments
LDFLAGS=
TREE_DEST=tree

MANDIR=${prefix}/man/man1
VERSION=1.5.2.2
BINDIR=${prefix}/bin
MAN=tree.1

2010-04-08

About Dual Boot

Optimizing Your Single Hard Drive Installation
There is a different setup for a single drive.
You can check any detected drive by using:
&] sudo fdisk -l
or
&] sudo blkid
or
&] ls -l /dev/disk/by-uuid

You can mount any FAT{16,32} by doing:
$] $myusb=/media/SHAR ; sudo mkdir $myusb
$] sudo mount -t vfat -o defaults,user,exec,uid=1000,gid=100,umask=000 /dev/sda8 $myusb

You can check the disks using the following command line:
&] sudo /sbin/fdisk -lu /dev/{h,s}d{a,b}


Optimizing Your Fedora
There are different ways.
You may check your Hard Drive with the following command:
&] sudo /sbin/fdisk -lu /dev/{h,s}d{a,b}

1st backup your files:
&] su
&] cp /etc/sudoers /etc/sudoers.orig
&] cp /etc/group /etc/group.orig

2nd become a sudoer:
  •  enable group wheel in /etc/sudoers
  •  add your username in wheel in /etc/group

3rd optimize yum:
&] sudo yum -y install yum-plugin-fastestmirror
&] sudo rpm -ivh http://download1.rpmfusion.org/free/fedora/rpmfusion-free-release-stable.noarch.rpm
&] sudo rpm -ivh http://download1.rpmfusion.org/nonfree/fedora/rpmfusion-nonfree-release-stable.noarch.rpm

4th optimize Network
&] sudo cp /etc/sysconfig/network-scripts/ifcfg-eth0 /etc/sysconfig/network-scripts/ifcfg-eth0.orig
&] sudo nano /etc/sysconfig/network-scripts/ifcfg-eth0

5th optimize mp3 players
&] sudo yum -y install xmms xmms-mp3 xmms-faad2 xmms-pulse xmms-skins
&] sudo yum -y install audacious audacious-plugins-freeworld*
&] sudo yum -y install banshee rhythmbox gstreamer-plugins-ugly gstreamer-plugins-bad gstreamer-ffmpeg
&] sudo yum -y install amarok xine-lib-extras-freeworld

6th optimize Media players
&] sudo yum -y install mplayer mplayer-gui gecko-mediaplayer mencoder
&] sudo yum -y install xine xine-lib-extras xine-lib-extras-freeworld
&] sudo wget  http://www.mplayerhq.hu/MPlayer/releases/codecs/all-20100303.tar.bz2
&] sudo mkdir -p /usr/lib/codecs
&] sudo tar -jxvf all-2010303.tar.bz2 --strip-components 1 -C /usr/lib/codecs/
&] sudo yum -y install vlc
&] sudo rpm -ivh http://rpm.livna.org/livna-release.rpm
&] sudo rpm --import /etc/pki/rpm-gpg/RPM-GPG-KEY-livna
&] sudo yum -y install libdvdcss
&] wget http://uk.real.com/download2/realplayer/11/linux/rpm/RealPlayer11GOLD.rpm
&] sudo rpm -i RealPlayer11GOLD.rpm

7th optimize your fonts
&] sudo wget http://www.mjmwired.net/resources/files/msttcore-fonts-2.0-3.noarch.rpm
&] sudo rpm -ivh msttcore-fonts-2.0-3.noarch.rpm

8th optimize Adobe
&] sudo rpm -ivh http://linuxdownload.adobe.com/adobe-release/adobe-release-i386-1.0-1.noarch.rpm
&] sudo rpm --import /etc/pki/rpm-gpg/RPM-GPG-KEY-adobe-linux
&] sudo yum -y install flash-plugin AdobeReader_enu

9th optimize GNU Java
&] sudo yum -y install java-1.6.0-openjdk java-1.6.0-openjdk-plugin

10th optimize Sun Java @ (rpm or bin) http://java.sun.com/javase/downloads/index.jsp
&] sudo sh jdk-6u19-linux-i586-rpm.bin
&] sudo /usr/sbin/alternatives --install /usr/bin/java java /usr/java/default/bin/java 20000
&] sudo /usr/sbin/alternatives --install /usr/lib/mozilla/plugins/libjavaplugin.so libjavaplugin.so /usr/java/default/lib/i386/libnpjp2.so 20000
&] sudo /usr/sbin/alternatives --config java
&] sudo /usr/sbin/alternatives --config libjavaplugin.so

11th optimize Samba
&] sudo cp /etc/samba/smb.conf /etc/samba/smb.conf.orig
&] sudo nano /etc/samba/smb.conf
&] sudo smbpasswd -a $username
&] sudo /etc/init.d/smb.conf start
&] /sbin/chkconfig --list smb
&] sudo /sbin/chkconfig --list smb
&] /sbin/chkconfig --level 35 smb on
&] sudo /sbin/chkconfig --list smb
&] sudo /etc/init.d/smb.conf restart
&] system-config-firewall
&] sudo system-config-firewall-tui
&] system-config-selinux

12th optimize Network configuration
&] sudo system-config-network
you can change localhost to any name
you can change .localdomain to any account (i.e. DynDNS.com)

17th optmize with Wine:
&] yum list|grep ^wine|awk '{print $1}'|xargs sudo yum -y install


Optimizing Your Kubuntu
There are different ways to do it, The Kunutnu installation is minimal.

1rst your software manager:
&] sudo apt-get -y install synatic

2nd edit your grub.cfg for a propet time out at login
&] grep time /boot/grub.cfg

3rd allow mount of ntfs:
&] apt-cache search ntfs|grep ntfs|awk '{print $1}' | grep -v dev | xargs sudo apt-get -y install

4th allow medibuntu:
&] sudo wget --output-document=/etc/apt/sources.list.d/medibuntu.list http://www.medibuntu.org/sources.list.d/$(lsb_release -cs).list && sudo apt-get --quiet update && sudo apt-get --yes --quiet --allow-unauthenticated install medibuntu-keyring && sudo apt-get --quiet update
&] sudo apt-get --yes install app-install-data-medibuntu apport-hooks-medibuntu
&] wget -c http://packages.medibuntu.org/pool/free/libd/libdvdcss/libdvdcss2_1.2.9-2medibuntu4_i386.deb
&] sudo dpkg -i libdvdcss2_1.2.9-2medibuntu4_i386.deb
&]  sudo apt-get -y install libdvdcss2 w32codecs alsa-firmware app-install-data-medibuntu hot-babe rmconverter realplayer non-free-codecs mplayer mplayer-gui mplayer-doc mencoder libavcodec-extra-52 libavdevice-extra-52 libavfilter-extra-0 libavformat-extra-52 libavutil-extra-49 libdvdcss2 libpostproc-extra-51 libswscale-extra-0

5th optimize with AdobeReader:
&] apt-cache search acroread|grep acroread|awk '{print $1}' |xargs sudo apt-get -y install

6th optimize using snort:
  • after installing snort,  answer the configuration prompt
  • Address range for the local network (router followed by /16 as 192.168.0.0/16)
7th optimize using debian-med port to ubuntu med-*

8th optimize using R:
&] apt-cache search r | awk '{print $1}' | grep ^r- | grep -v dbg | sudo xargs apt-get -y install

19th optimize with Wine (windows emulator) using apt-get

2010-04-02

About MBF

Microsoft Biology Initiative

It is another intent to break into open source and free software in the scientific community but the community does not like it, you can follow their site.

Microsoft Biology Foundation Training

You can follow the installation requisites in their site.

Download and install the MBF.
Download and install the ShoRuntime.
Download and install the source code.

Microsoft Research Sho Library

Please refer to their site.
Please refer to the documentation.
Please refer to the API Reference.
Please refer to the Package Reference.
Please refer to the External API Guide.

Microsoft Biology Tools

Download and install the NodeXL.
Download and install the Sequence Assembler.
Download and install the BL!P (MS Silverlight PivotViewer needed).

Microsoft Research Biology Extension for Excel

Please refer to their site.

Microsoft Computational Biology Tools

Download and install the PhyloD, Epitope Prediction, HLA Completion & Assignement, Create Epitope and False Discovery Rate for 2x2 contingency tables.

Microsoft Biological Computation Tools

Download and install the Synthesizing Biological Theories: site, manual and package.

Microsoft Researcher Tools

Download and install the GenePattern Add-in for Word.
Download and install the Ontology Add-in for Word: site and Codeplex.
Download and install the Chemistry Add-in for Word: site, font DLL and Codeplex.
Download and install the Infer.NET machine learning library: site, package, follow the UserGuide, try the first tutorial, all the tutorials and examples, the API and the references.
Download and install the SIGMA Large Scale Machine Learning Toolkit: package.
Download and install the 3D Molecule Viewer.
Download and install the QUT.Bio: site.
Download and install the RNA Comparative Analysis Software Tool.
Download and install the Athena Modular CAD/CAM Software for Synthenic Biology.
Download and install the Project Trident from Codeplex.
Download and install the WinBioinfTools.

2010-03-18

About iPhone

Optimizing Your Project
There are different people on your team list.
Create a list and register them on AppleDevSite as a developer, create your project list to upload (i.e. StarRD.txt) in your porta;
FirstName   LastName   Email
Joe    Doe    joe.doe@mail.com

There are developer certificates for each team member.
Once each of your team members has created a Certificate Signing Request (i.e. EnriqueEscobar.CertSigningRequest) you may submit uploading at AppleDevCenter.

There is an app ID to provide as com.domain.YourAppID.

There is a provisioning to set. You will need:
  • ProfileName
  • Certificate (a list of registered developers)
  • AppID
  • Device (list of device to register)

There is to validate the developer certificate once your portal admin has accepted you.
Retrieve and install in your own OSX machine the AppleDeveloperCertificate (AppleWWDRCA.cer) and your certificate (developer_identity.cer), you may download it at AppleDevSite.


There is a mobileprovision to deploy.

There are different configurations:

There is a configuration to manage in XCode for your your ProjectName:

  • Right click and choose GetInfo dialog ( or command I)
  • Select tab Configuration
  • On list of configurations choose Release and select the option Duplicate
  • Give a name to this configuration (i.e. Distribution)
  • Close window
There is a Target Information to set:
  • Right click and choose GetInfo dialog
  • Select Build tab
  • Choose Distribution from Configuration drop-down
  • In the Architectures section in the list of settings, choose a Base SDK (e.g. Device - iPhone OS 2.2.1)
  • From the Code Signing Section, under Code Signing Identity, choose the appropriate profile (e.g. Ad Hoc or Distribution Profile)
  • Select Properties tab
  • Set Executable name (e.g. theAstrologerFree). There is a default value here: ${EXECUTABLE_NAME} which will also work for most projects
  • Set Identifier to com.domain.application-name (e.g. com.3SixtySoftware.theAstrologerFree). There is a default value here: com.your company.${PRODUCT_NAME:identifier} which you may work for your project. If you run into errors or conflicts with other applications try replacing ${PRODUCT_NAME:identifier} with a unique string that represents your application name
  • Set Icon File to Icon.png
  • Make sure you have an icon that is 57x57 pixels, with the name Icon.png in the project
  • Set Version # (e.g. 1.1)
  • Close the window
For each active configuration you have to update your project:

There are an Active Configuration to set:
  • Select the Debug workspace button
  • From the drop-down (upper left) choose:
    • Choose the Device Setting you plan to target under Active SDK (e.g. Device - iPhone OS 2.2.1)
    • Choose Distribution as the Active Configuration
  • Select the Project workspace button (the button to the left of Debug)
  • If creating an Ad Hoc Distribution:
    • Create new file (Command N), select Code Signing, choose Entitlements, click Next
    • Name the file Entitlements.plist
    • Uncheck the get-task-allow button
    • Save file
    • Make sure the file is at the root of project hierarchy (e.g. drag the file just below the Project name)
    • Select the Target
    • Right click and choose Get Info dialog
    • Select Build tab
    • Fill in the Code Signing Entitlements with Entitlements.plist
There is a target settings verification to do:
  • Select the Target
  • Right click and choose Get Info dialog
  • Select Properties tab
  • Note the Executable name (e.g. theAstrologerFree)
  • Select Build tab
    • Scroll down to Packaging
    • Verify (or input) the Product Name to match the Executable name from above
  • Close the window

There are different *.plist foreach configuration to verify:


  • Check the Info.plist in the resources folder
  • Check the following:
    Bundle Display Name - this is the text that will appear on the iPhone Home screen under the icon
    Executable name - this should match what youʼve entered in the Properties settings
    Icon must be set to Icon.png
    Bundle Identifier - for example com.3SixtySoftware.theAstrologerFree
    Bundle version - for example 1.1

For each configuration you have a Certificate *.cer and an ID *.p12 (it starts with iPhone):


There are different certificates for different users:


There is a Clean and Build to do:
  • From the Build menu choose choose Clean All Targets
  • From the Build menu choose Build (Command B)

RtoCSharp

We always read the manual.
Set a environment variable ROOTDRIVE='C:'

2010-03-07

About Linux

Optimizing Hard Drive
There are good Drives to have:
  • /root folder with its environment variable export ROOT=/root
  • /Applications folder with its environment variable export APPS=/Applications
  • /home folder with no environment variable export
  • /Data folder with its environment variable export DATA=/Data
  • /Shar folder with its environment variable export SHAR=/Shar
  • /opt folder with its environment variable export OPTS=/opt

2010-03-03

About CSharp

CSharp Tools

There are nice tools to optimize your work:
  • ReSharper
  • .Net managed (plug-in for ReSharper) resources StyleCop
  • .Net managed assemblies FxCop
  • Reflector
  • GhostDoc
  • NDoc3 (for Mono)
  • NUnit (2.4.8 for mono)
  • xUnit and xUnitContrib for Resharper
  • SilverLight
  • IronPyhton 2.0.1 runtime
  • IronRuby 1.1.3 corresponding to Ruby 1.9
  • Trident Activities and workflow
  • SandCastle (for Mono DXROOT=D:\Sandcastle\;DX_PATH=%DXROOT%\ProductionTools) for help file from API (you need also HtmlHelper HTMLHELP_PATH=D:\HTML Help Workshop)
  • DPack
  • Javascript Parser
  • Jscript Brace Matching Extension
  • Jscript Editor Extensions 
  • Jscript IntelliSense Para Extension
  • Jscript Outlining Extension
  • Jscript Word Highlighter Extension 
  • Microsoft All-In-One Code Framework Sample Browser 
  • Productivity Power Tools 
  • Regex Editor 
  • Spell Checker 
  • VSColorOutput 
  • REP++
  • Web Essentials
  • Web Standards Update  

Set a CSharp class template

We always read the manual.

public class MyClass : IDisposable
{
#region AttributeMembers
#region PublicAttributes


#endregion

#region PrivateAttributes

/// Flag for disposed resources private bool _IsDisposed = false; #endregion

#region ProtectedAttributes
#endregion

#endregion

#region AttributeAccessors

#region Getters

#endregion

#region Setters

#endregion

#region Mutators

#endregion

#endregion

#region Constructors

/// Initializes a new instance of the class. public MyClass()

{ }

#endregion
#region Destructor
/// Releases unmanaged resources and performs other cleanup operations before the
/// is reclaimed by garbage collection.
/// This destructor will run only if the Dispose method does not get called.
/// It gives your base class the opportunity to finalize.
/// Do not provide destructors in types derived from this class.
~MyClass()
{
// Do not re-create Dispose clean-up code here.
// Calling Dispose(false) is optimal in terms of readability and maintainability.
Dispose(false);

}
#endregion
#region MethodMembers

#region PrivateMethods
/// Performs application-defined tasks associated with freeing, releasing, or resetting unmanaged resources.
/// true to release both managed and unmanaged resources; false to release only unmanaged resources.

private void Dispose(bool isDisposing)
{

//Check if Dispose has been called

if (!this._IsDisposed)

{//dispose managed and unmanaged resources

if (isDisposing)

{//managed resources clean

this._DestZip = this._Src2Zip = null;

this._FileZip = null;//~

}

//unmanaged resources clean


//confirm cleaning

this._IsDisposed = true;

}

}

#endregion

#region PublicMethods

/// Performs application-defined tasks associated with freeing, releasing, or resetting unmanaged resources.
/// Do not make this method virtual, a derived class should not be able to override this method.
public void Dispose()
{
Dispose(true);
GC.SuppressFinalize(this);
}
#region PublicAbstractMethods
#endregion
#region PublicOverrideMethods
#endregion
#region PublicVirtualMethods
#endregion
#endregion
#endregion
}


C# project file (.csproj)

Edit the .csproj in order to have your custom folder for your solution.
You can add them like :

<ItemGroup>
  <Folder Include="app\" />
  <Folder Include="bin\" />
  <Folder Include="data\" />
  <Folder Include="doc\" />
  <Folder Include="ext\" />
  <Folder Include="ico\" />
  <Folder Include="lib\" />
  <Folder Include="modules\" />
  <Folder Include="obj\" />
  <Folder Include="pkg\" />
  <Folder Include="script\" />
  <Folder Include="src\" />
  <Folder Include="sql\" />
  <Folder Include="temp\" />
  <Folder Include="test\" />
</ItemGroup>


RtoCSharp

We always read the manual.


After you installed R and RDCOM in windows, Add Reference to COM.
Check if you succeeded in the reference tab.
Now you can use it into code:
//use 4 COM:R(D)COM
using STATCONNECTORCLNTLib;
using StatConnectorCommonLib;
using STATCONNECTORSRVLib;

2010-02-23

About Mono

Download

We always read the manual.

Mono for Windows

We always read the manual to start your Mono projects and have fun.
  1. Download the file for Mono 2.10.4 for Windows, Gtk# 2.12.11, and XSP and do the Port Selection default:8080
  2. Download, if you don't have MSVisualStudio, the dotNetFramwork2.0SP2, the dotNetFramework3.5, the dotNetFramwork4.0
  3. Download the Gtk# for .NET 2.12.10
  4. Download the Mono Migration Tools MoMa with its definition.
  5. Download the MonoDevelop 2.6beta3.

About Cygwin

Installation and package selection

A good habit is to always have the latest cygwin_setup_executable to have.
Since 2015 you need the lib-usb library to install and the Bonjour Print Services native library from Apple.
In order to have an optimal execution you should always install it on C:\cygwin\ or on D:\cygwin\ .
Install it for "All Users" using the "Unix / binary" mode.

In future updating of packages already on your system, you can simply start the installer and keep hitting "Next" without any other interaction. It remembers what you've already told it.
Now setup.exe has been primed with your preferences, you can update your installation using "unattended" mode with -q.

Cygwin 1.7's setup.exe introduces a -P switch which takes a list of extra packages.
$] setup.exe -q -P aspell-en,cron,ctags,exim,gcc-g++,inetutils,make,mingw-runtime,ncurses,openssh,patch,perl,python,ruby,rxvt,subversion,vim

Configuration
You may have this output at login.

Your group is currently "mkgroup".  This indicates that
the /etc/group (and possibly /etc/passwd) files should be rebuilt.
See the man pages for mkpasswd and mkgroup then, for example, run
mkpasswd -l [-d] > /etc/passwd
mkgroup  -l [-d] > /etc/group
Note that the -d switch is necessary for domain users.


&] cp /etc/passwd /etc/passwd.orig
&] mkpasswd -l -d > /etc/passwd
&] cp /etc/group /etc/group.orig
&] mkgroup -l -d > /etc/group

If you don't know otherwise then you should follow the suggestion, including the note about -d where relevant. After doing that, double-click on the Cygwin icon again to set up your home directory. If you don't then, for example, Terminator will fail to find your home directory and refuse to start.
Even on Cygwin-1.7, you will want to follow the above instructions if, for example, ssh is to think of your home directory as something other than /tmp .

Version validation
$] grep -e 'Installing .*cygwin-[0-9].*\.bz2' /var/log/setup.log

Using environment variables

We may use the following:
  • CYGWIN='tty acl nodosfilewarning title glob winsymlinks proc_retry:3' #ntsec deprecated
  • CYGWIN_HOME=D:\cygwin
  • CYGWIN_PATH=%CYGWIN_HOME%\bin;%CYGWIN_HOME%\sbin;%CYGWIN_HOME%\usr\bin;%CYGWIN_HOME%\usr\sbin;%CYGWIN_HOME%\usr\local\bin
  • CYGWIN_PATH=D:\cygwin\bin;D:\cygwin\sbin;D:\cygwin\usr\bin;D:\cygwin\usr\sbin;D:\cygwin\usr\local\bin
  • LANG=en_US.UTF-8
  • TERM=cygwin
  • HOME="%HOME%\%HOMEPATH%" # A) map it to your windows home using windows user variables *
  • HOME=E: for system and export HOME=%HOME %\%USERNAME% # B) map it to another drive *
  • &] rm -rf "/home/$USERNAME" ; ln -s "/home/$HOME" "/home/$USERNAME" # only for A) and B) *
  • HOME="/home/%USERNAME%" # C) create a default directory in cygwin using windows user variables
  • concat HOME to fstab: $] echo "$USERPROFILE /home/$USERNAME ntfs binary  0 0" >>/etc/fstab ; # D) mount your windows home
  • &] unset TEMPDIR; export TEMPDIR=/temp
  • &] unset TMP; export TMP=/tmp
  • &] unset TEMP; export TEMP=/temp
  • &] export EDITOR=
  • &] export VISUAL=
Using Cygwin to map your WindowsXP home
&] ls ~/My\ Documents/ | while read trgt_ ; do link_=` echo "$trgt_" | sed 's/My\ //g' ` ; echo "ln -s My Documents/$trgt_ $link_" ; ln -s ~/"My Documents/$trgt_" ~/"$link_" ; done
&] ln -s ~/My\ Documents ~/Documents
&] ln -s "$HOMEDRIVE$HOMEPATH"/Application\ Data ~/Application\ Data
&] ln -s "$HOMEDRIVE$HOMEPATH"/Cookies ~/Cookies
&] ln -s "$HOMEDRIVE$HOMEPATH"/Desktop ~/Desktop
&] ln -s "$HOMEDRIVE$HOMEPATH"/Favorites ~/Favorites
&] ln -s "$HOMEDRIVE$HOMEPATH"/Local\ Settings ~/Local\ Settings
&] ln -s "$HOMEDRIVE$HOMEPATH"/NetHood ~/NetHood
&] ln -s "$HOMEDRIVE$HOMEPATH"/PrintHood ~/PrintHood
&] ln -s "$HOMEDRIVE$HOMEPATH"/Recent ~/Recent
&] ln -s "$HOMEDRIVE$HOMEPATH"/SendTo ~/SendTo
&] ln -s "$HOMEDRIVE$HOMEPATH"/Start\ Menu ~/Start\ Menu
&] ln -s "$HOMEDRIVE$HOMEPATH"/Templates ~/Templates
&] ln -s "$HOMEDRIVE$HOMEPATH"/Tracing ~/Tracing
&] ln -s "$HOMEDRIVE$HOMEPATH"/UserData ~/UserData
&] ln -s "$HOMEDRIVE$HOMEPATH"/My\ Videos Movies
&] mkdir perl5 Sites iTunes
&] ln -s /cygdrive/W ~/wuala
&] ln -s wuala/WualaDrive WualaDrive
&] ln -s /cygdrive/Z ~/ZumoDrive

Using Cygwin in the Command Prompt
We can always use Cygwin commands if we add the environement variables in Path=Path;%CYGWIN_HOME%;%CYGWIN_PATH%
.
|-- Application Data
|-- Cookies
|-- Desktop
|-- Documents
|-- Downloads
|-- Dropbox
|-- eBooks
|-- Favorites
|-- Local Settings
|-- Magic Briefcase
|-- Movies
|-- Music
|-- My Documents
|-- NetHood
|-- perl5
|-- Pictures
|-- PrintHood
|-- Public
|-- Received Files
|-- Recent
|-- RemoteDesktop
|-- Resumes
|-- SendTo
|-- Sites
|-- Start Menu
|-- Templates
|-- Tracing
|-- UserData
|-- Videos
|-- Visual Studio 2008
|-- WirelessConnexions
|-- wuala
`-- ZumoDrive

Optimizing Hard Drive
There are good Drives to have:
  • /root folder with its environment variable &] unset ROOTDRIVE; export ROOTDRIVE=/root
  • /Applications folder with its environment variable &] unset APPSDRIVE; export APPSDRIVE=/Applications
  • /home folder with no environment variable export ?
  • /data folder with its environment variable &] unset DATADRIVE; export DATADRIVE=/data
  • /shar folder with its environment variable &] unset SHARDRIVE; export SHARDRIVE=/shar
  • /opt folder with its environment variable &] unset OPTSDRIVE; export OPTSDRIVE=/opt
Choosing a better console: rxvt

You can launch it using:
$] /usr/bin/rxvt -fn Terminal -scrollBar_right -bg blue4 -fg white -ls --saveLines 9999

Adding cool commands
There are good commands to have:
  • tree from his website copy it to / and uncompress it to install
  • mrxvt from his website and follow the procedure
  • fonts
  • asd
Default permissions

$] chmod o-w /usr/local/bin
$] chmod o-w /usr/local
$] chmod o-w /usr
$] chmod o-w /etc
$] chmod o-w /usr/sbin
$] chmod o-w /usr/bin
$] chmod o-w /usr/X11R6/bin
$] chmod o-w /usr/X11R6
$] chmod o-w /cygdrive/c
 

Install aptitude for cygwin

Try this apt-cyg a command-line installer for Cygwin which cooperates with Cygwin Setup and uses the same repository. The syntax is similar to apt-get.
$] svn --force export http://apt-cyg.googlecode.com/svn/trunk/ /bin/ 
$] chmod +x /bin/apt-cyg
$] apt-cyg install nano 

Its usage goes as it follows:
  • "apt-cyg install " to install packages
  • "apt-cyg remove " to remove packages
  • "apt-cyg update" to update setup.ini
  • "apt-cyg show" to show installed packages
  • "apt-cyg find " to find packages matching patterns
  • "apt-cyg describe " to describe packages matching patterns
  • "apt-cyg packageof " to locate parent package

Case sensitive filenames

In the Win32 subsystem filenames are only case-preserved, but not case-sensitive. You can't access two files in the same directory which only differ by case, like Abc and aBc. While NTFS (and some remote filesystems) support case-sensitivity, the NT kernel starting with Windows XP does not support it by default. Rather, you have to tweak a registry setting and reboot. For that reason, case-sensitivity can not be supported by Cygwin, unless you change that registry value.
If you really want case-sensitivity in Cygwin, you can switch it on by setting the registry value
"HKLM\SYSTEM\CurrentControlSet\Control\Session Manager\kernel\obcaseinsensitive"
to 0 and reboot the machine. For least surprise, Cygwin expects this registry value also on Windows NT4 and Windows 2000, which usually both don't know this registry key. If you want case-sensitivity on these systems, create that registry value and set it to 0. On these systems (and only on these systems) you don't have to reboot to bring it into effect, rather stopping all Cygwin processes and then restarting them is sufficient.

    HTMLCode

    HTMLCode Content